Stop duplicating deep learning training datasets with Amazon EBS multi-attach

(Edit 02/26/20: AWS support team has put out a warning discouraging the use of standard file systems such as xfs with EBS multi-attach. xfs is not a cluster-aware file system and may lead to data loss in a multi-access cluster setup. In my experiments, both examples in this blog post ran with no issues, but exercise caution for production workloads. Read more here.)
Some of you doing deep learning are lucky enough to have infrastructure teams who’ll help set up GPUs clusters for you, install and manage job schedulers, and host and manage file systems for training datasets.
The rest of you, well, you have to manage your own setups. At some point in your development process, you’ll start to explore distributed training and running parallel model and hyperparmeter search experiments. And as you consider scaling options, you realize that adding more GPUs with EC2 is easy. The not so easy part? — replicating and managing datasets.
If you’re cloud savvy, you could go through the process of creating and managing Amazon EBS volume snapshots for your training datasets, or you could host a network attached file system for all your training EC2 instances. But let’s face it, that’s more work than you signed up for, when all you want to do is go back to developing machine learning models.
AWS recently announced, in my opinion, one of the most exciting AI/ML updates since re:invent 2019 in December — the new multi-attach capability for Amazon EBS. You can now attach a single EBS volume to multiple EC2 instances, And up to a maximum of 16 EC2 instances! For deep learning, that translates is a single EBS volume to feed training data to up-to 128 GPUs! You get all network file systems like benefits from EBS volumes that you already use.
In this blog post, I am going to present a step-by-step walkthrough of running distributed training on multiple EC2 GPU instances. I’ll show you how you can use a single EBS volume to store your entire training dataset, and attach it to multiple EC2 instances. No more copying and duplicating datasets!
This blog post contains 2 deep learning examples using EBS multi-attach:
- The first example is a step by step walkthrough of setting up 2 GPU EC2 instances with a common EBS volume attached to both and running distributed training on a CIFAR-10 dataset
- The second example is a more realistic scenario showing how to train on ImageNet dataset using 16 GPUs. The ImageNet dataset consumes 144 GB on disk, and with EBS multi-attach you no longer have to make copies of it across multiple instances.
All the code and examples are available on GitHub here: https://github.com/shashankprasanna/distributed-training-ebs-multi-attach.git
If you’re interested in alternative ways to manage clusters and storage, scroll down to the “Alternatives and recommendations” section.
Example 1: Distributed deep learning training with TensorFlow and Horovod on Amazon EC2 and Amazon EBS multi-attach
To demonstrate the process of using EBS multi-attach feature for distributed deep learning training, I use a simple two node setup where each node in a g4dn.xlarge EC2 instances which has a single NVIDIA T4 GPU. To follow along, I assume you have an AWS account, and AWS CLI tool installed on your host machine. You will primarily be using AWS CLI to create and manage resources, however, you can also perform most of these steps using the AWS console.
Step 1: Launch EC2 instances
First launch 2 EC2 instances of type g4dn.xlarge. G4 instances are less powerful than P3 instances for deep learning training, but are inexpensive and great for prototyping. G4 instances really shine when it comes to inference workloads, and you can learn more about them on the G4 product page.
aws ec2 run-instances \
 --image-id ami-07728e9e2742b0662 \
 --security-group-ids <SECURITY_GROUP_ID> \
 --count 2 \
 --instance-type g4dn.xlarge \
 --key-name <KEYPAIR_NAME> \
 --subnet-id <SUBNET_ID> \
 --query “Instances[0].InstanceId”
The image-id corresponds to the Deep Learning AMI Ubuntu Image which comes pre-installed with deep learning frameworks such as TensorFlow, PyTorch, MXNet and others. Specify your security-group-ids, key-name and subnet-idand launch your instances. You should see the instance IDs for each of the instances in the output.
Output:
[
“i-<INSTANCE_ID>”,
“i-<INSTANCE_ID>”
]
Ensure that your security group allows TCP traffic on all ports for Message Passing Interface (MPI) to work. Horovod library which this example uses to do distributed training, relies on MPI communication protocol to talk to all other EC2 instances and share workload during training.

Screenshot showing security group allowing TCP communication on all ports
Add tags for the newly created EC2 instances. Let’s name themgpu-instance-1 and gpu-instance-2 to make them easily identifiable and searchable in the AWS console. Through the rest of the post, I’ll be referring to the instances with these names.
aws ec2 create-tags --resources <INSTANCE_ID> --tags Key=Name,Value=gpu-instance-1
aws ec2 create-tags --resources <INSTANCE_ID> --tags Key=Name,Value=gpu-instance-2
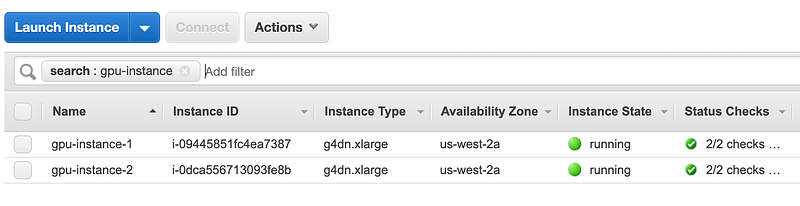
AWS EC2 console showing gpu-instance-1 and gpu-instance-2
Step 2: Create an EBS volume with multi-attach enabled for storing training datasets
Create a 100G volume in the same availability zone as the SUBNET_ID the EC2 instances were launched in. i.e. The EBS volume must be in the same availability zone (AZ) as the EC2 instance it’ll be attached to. In this example, I have both my EC2 instances and EBS volume in us-west-2a availability zone and the corresponding subnet-id as shown the AWS VPC console.

Ensure that the EC2 instance subnet-id corresponds to EBS volume availability zone (us-west-2a)
To create a 100G volume in us-west-2a with a name tag Training Datasets, run the following:
aws ec2 create-volume --volume-type io1 --multi-attach-enabled --size 100 --iops 300 --availability-zone us-west-2a --tag-specifications 'ResourceType=Name,Tags=[{Key=Name,Value=Training Datasets}]'

Screenshot showing newly created EBS volume in the us-west-2a availability zone
Step 3: Attach EBS to multiple EC2 instances
In this example you’re only working with 2 EC2 instances, so you’ll call aws ec2 attach-volume twice with the correct instance ID at attach the EBS volume to both the EC2 instances. Repeat this step if you have additional EC2 instances that need to access this EBS volume.
aws ec2 attach-volume —-volume-id vol-<VOLUME_ID> —-instance-id i-<INSTANCE_ID> --device /dev/xvdf
aws ec2 attach-volume —-volume-id vol-<VOLUME_ID> -—instance-id i-<INSTANCE_ID> --device /dev/xvdf
Output:
{
“AttachTime”: “2020–02–20T00:47:46.563Z”,
“Device”: “/dev/xvdf”,
“InstanceId”: “i-<INSTANCE_ID>”,
“State”: “attaching”,
“VolumeId”: “vol-<VOLUME_ID>”
}
Step 4: Download code and datasets to the EBS volume
Get instance IP addresses so we can SSH into the instance
aws ec2 describe-instances --query 'Reservations[].Instances[].{Name:Tags[0].Value,IP:PublicIpAddress}' --filters Name=instance-state-name,Values=running
Output:
[
 {
  “Name”: “gpu-instance-1”,
  “IP”: “<IP_ADDRESS>”
 },
 {
  “Name”: “gpu-instance-2”,
  “IP”: “<IP_ADDRESS>”
 }
]
Use your keypair to SSH to the first instance gpu-instance-1
From your host machine, use the EC2 key-pair to SSH to gpu-instance-1
ssh -i ~/.ssh/<key_pair>.pem ubuntu@<IP_ADDRESS>
Run lsblk to identify the volume to mount
lsblk
Output:
…
…
nvme0n1 259:2 0 95G 0 disk
└─nvme0n1p1 259:3 0 95G 0 part /
nvme1n1 259:1 0 116.4G 0 disk
nvme2n1 259:0 0 100G 0 disk
Note: the order of volumes is not guaranteed, check to confirm that exact name of your volume. It should be either nvme1n1 or nvme2n1. If you’ve attached additional EBS volumes then it could have different names.
Create a new file system
Since this is a new EBS volume, it doesn’t have a file system yet. If there isn’t a file system, you should see an output like this:
sudo file -s /dev/nvme2n1
Output:
/dev/nvme2n1: data
So let’s create a file system:
sudo mkfs -t xfs /dev/nvme2n1
Confirm that the file system was created:
sudo file -s /dev/nvme2n1
Output:
/dev/nvme2n1: SGI XFS filesystem data (blksz 4096, inosz 512, v2 dirs)
Create a dataset directory under home and mount the EBS volume
mkdir ~/datasets
sudo mount /dev/nvme2n1 ~/datasets
Download CIFAR10 training dataset to the volume
cd ~/datasets
git clone https://github.com/shashankprasanna/distributed-training-ebs-multi-attach.git
source activate tensorflow_p36
python ~/datasets/distributed-training-ebs-multi-attach/generate_cifar10_tfrecords.py --data-dir ~/datasets/cifar10
Verify that the dataset was downloaded (install the tree package using sudo apt install tree)
tree ~/datasets/cifar10
Output:
/home/ubuntu/datasets/cifar10
├── eval
│ └── eval.tfrecords
├── train
│ └── train.tfrecords
└── validation
  └── validation.tfrecords
Step 5: Authorize SSH communications between gpu-instance-1 and gpu-instance-2 EC2 instances
The first EC2 instance gpu-instance-1 should be authorized to establish SSH connection to gpu-instance-2. Run the following steps on gpu-instance-1
Create a new key pair on gpu-instance-1
Run ssh-keygen and hit enter twice to create a new key pair.
ssh-keygen
ls ~/.ssh
Output:
authorized_keys id_rsa id_rsa.pub
Select and copy the public key from the terminal to clipboard
cat ~/.ssh/id_rsa.pub
Add the copied public key to authorized_key in gpu-instance-2
From your host machine (not gpu-instance-1), establish an SSH connection to gpu-instance-2 and add the public key of gpu-instance-1 to the authorized key list in gpu-instance-2. Get the IP address using instructions in Step 4.
ssh -i ~/.ssh/<key_pair>.pem ubuntu@<IP_ADDRESS>
cat >> ~/.ssh/authorized_keys
At the prompt paste your clipboard contents and hit Ctrl+d to exit (Alternatively you could use your favorite text editor to open ~/.ssh/authorized_keys and paste the key at the end of the file, save and exit)
Confirm that the key has been added
cat ~/.ssh/authorized_keys
Confirm that you can establish an SSH connection from gpu-instance-1 to gpu-instance-2
SSH from your host machine to gpu-instance-1. And from gpu-instance-1, establish an SSH connection to gpu-instance-2 to ensure that they two instances can communicate.
On gpu-instance-1, run:
ssh <IP_GPU_INSTANCE_2>
You should be able to successfully log into gpu-instance-2
Step 6: Mount the multi-attached EBS volume on gpu-instance-2
SSH to gpu-instance-2 from your host machine and follow the same steps as in Step 4 to ssh into gpu-instance-2, mount the EBS volume.
ssh -i ~/.ssh/<key_pair>.pem ubuntu@<IP_ADDRESS>
mkdir ~/datasets
lsblk
Output:
…
…
nvme0n1 259:2 0 95G 0 disk
└─nvme0n1p1 259:3 0 95G 0 part /
nvme1n1 259:1 0 116.4G 0 disk
nvme2n1 259:0 0 100G 0 disk
Mount the EBS volume as read-only if you don’t intend to write metadata or other debug information on to the volume during training. If you do wish to use the same volume to save other information during training, remove the -o ro option below. Be sure to create a dedicated location on the volume to save your information to avoid potential data loss due to multiple instances writing into the same volume.
sudo mount -o ro /dev/nvme2n1 ~/datasets
Verify that you can see the dataset (Install the tree package using sudo apt install tree)
tree ~/datasets/cifar10
Output:
/home/ubuntu/datasets/cifar10
├── eval
│ └── eval.tfrecords
├── train
│ └── train.tfrecords
└── validation
└── validation.tfrecords
Perform a one time activation of the TensorFlow environment to initialize keras config files in ~/.keras
source activate tensorflow_p36
Step 7: Run distributed training
Get the private IP of gpu-instance-2 by running the following command
aws ec2 describe-instances --query 'Reservations[].Instances[].{Name:Tags[0].Value,IP:PrivateIpAddress}' --filters Name=instance-state-name,Values=running
Or by looking it up on the AWS EC2 console.
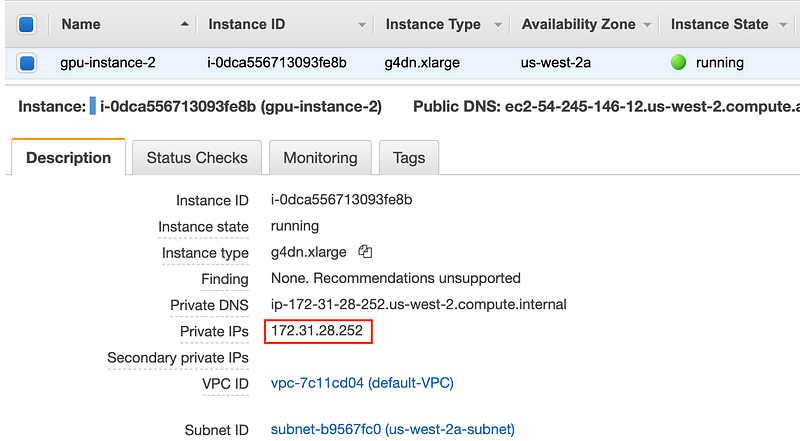
Screenshot of the AWS EC2 console showing private IP address of gpu-instance-2
SSH to the gpu-instance-1 EC2 instance from your host machine and replace <PRIVATE_IP_ADDR> with the private IP address of gpu-instance-2 in the run-dist-training-cifar10 script using your favorite editor.
vim ~/datasets/distributed-training-ebs-multi-attach/run-dist-training
Deactivate tensorflow_p36 environment if it’s still active
source deactivate
And start distributed training
sh datasets/distributed-training-ebs-multi-attach/run-dist-training-cifar10
The training should initiate. You’ll see in the terminal output that there are two entries for each epoch, corresponding to training running on both EC2 instances in distributed fashion. You can always monitor GPU utilization on each instance by running nvidia-smi. I’ve provided a screen shot of this in the next example below.
…
Epoch 25/30
156/156 [==============================] — 7s 46ms/step — loss: 1.2140 — acc: 0.5605 — val_loss: 1.3709 — val_acc: 0.4946
Epoch 25/30
156/156 [==============================] — 7s 47ms/step — loss: 1.2073 — acc: 0.5665 — val_loss: 1.2615 — val_acc: 0.5337 ETA: 0s — loss: 1.2065 — acc: 0.5670
Epoch 26/30
156/156 [==============================] — 7s 47ms/step — loss: 1.2005 — acc: 0.5665 — val_loss: 1.2615 — val_acc: 0.5337
Epoch 26/30
156/156 [==============================] — 7s 46ms/step — loss: 1.2034 — acc: 0.5677 — val_loss: 1.2524 — val_acc: 0.5239 ETA: 0s — loss: 1.1819 — acc: 0.5729
Epoch 27/30
156/156 [==============================] — 7s 46ms/step — loss: 1.1850 — acc: 0.5677 — val_loss: 1.2524 — val_acc: 0.5239
Epoch 27/30
156/156 [==============================] — 7s 46ms/step — loss: 1.1833 — acc: 0.5769 — val_loss: 1.1436 — val_acc: 0.5825 ETA: 0s — loss: 1.1798 — acc: 0.5774
Epoch 28/30
156/156 [==============================] — 7s 46ms/step — loss: 1.1797 — acc: 0.5769 — val_loss: 1.1436 — val_acc: 0.5825
Epoch 28/30
…
Example 2: Distributed training using the 144 GB Imagenet dataset on 16 GPUs using a single EBS volume for training dataset
Follow steps 1,2, and 3 from Example 1, with the following change to step 1 - update the GPU instance from g4dn.xlarge to p3dn.24xlargeunder instance-type. p3dn.24xlarge instance includes 8 NVIDIA V100 GPUs.
In step 4, instead of downloading the CIFAR10 dataset, download the 144 GB ImageNet dataset as described in the documentation under the section “Prepare the ImageNet Dataset”. Continue to follow steps 5 and 6 from Example 1.
Once you’re all set up, run the following script to launch distributed training:
cd ~/datasets
git clone https://github.com/shashankprasanna/distributed-training-ebs-multi-attach.git
sh datasets/distributed-training-ebs-multi-attach/run-dist-training-cifar10
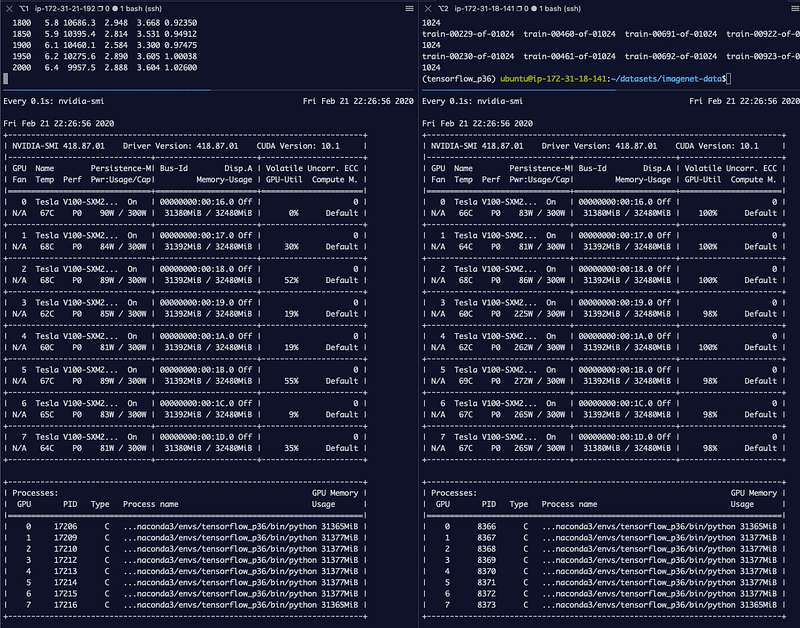
Screenshot showing GPU utilization on gpu-instance-1 and gpu-instance-2 during training
Limitations
The feature documentation page has a list of considerations and limitations for the multi-attach feature, and I suggest going through it to avoid some potential future pain: https://docs.aws.amazon.com/AWSEC2/latest/UserGuide/ebs-volumes-multi.html#considerations
Key considerations for machine learning workloads are:
- Avoid having multiple instances write into the multi-attached EBS volume. You don’t get any protection against data overwrites. I suggest using it in a write-once, and read-many manner.
- The feature is only available on nitro-based instances. Nitro systems rely on AWS-built hardware and software and generally provide better performance. The downside is that you have a smaller list of instances to choose from. For deep learning training you have a choice of G4 based instances and
p3dn.24xlargeinstance. - You can only multi-attach an EBS volume to instance in the same availability zone.
Alternatives and recommendation for distributed training
The above setup is great for a small team of developers and data scientists who don’t want to deal with complexities associated with container technologies and network file systems. However at some point in the machine learning development process, it helps to start containerizing your workloads and leverage cluster orchestration services to manage large-scale machine learning.
For training cluster management on AWS you have a couple of options: Amazon Elastic Kubernetes Services (EKS), Amazon Elastic Container Service (ECS). You’ll have to venture deeper into devops territory to learn the mystic arts of managing production EKS an ECS clusters. As machine learning practitioners, you may prefer not to do that.
At the fully managed end of the spectrum, there is Amazon SageMaker, which in my opinion is one of the simplest and easiest ways to scale your training workloads. And as an added bonus it seamlessly integrates with Amazon S3, so you don’t have to manage dataset migrations.
On the storage side of things, you could consider hosting an Amazon Elastic File System (EFS), and mount it to all your instances. One of the nice benefits of EFS is that it’s multi-availability zone (AZ), and you can mount the file systems to EC2 instances in multiple subnets in the same region. For higher performance you could consider Amazon FSx for Lustre file system. The nice benefit of FSx for Lustre is that it can be linked to an existing Amazon S3 bucket. If your data lives in S3 to start with you don’t have to move your datasets from S3 to FSx for Lustre and worry about syncing changes, it’s done automatically for you!
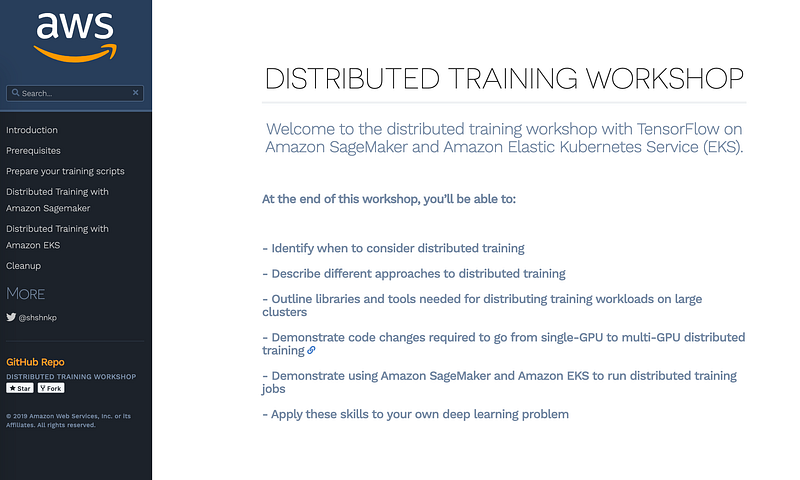
If you’re interested in any of the above approaches, you could try them yourselves following instructions here: distributed-training-workshop.go-aws.com/
Before you go another small piece of recommendation: always scale-up before you scale-out
Scaling up is the process of packing more compute on to a single machine. In other words, start with a single EC2 instance with a smaller GPU like a G4. If your experiments are going well, replace it with a more powerful GPU like the V100 on p3.2xlarge . If you want more horsepower, then get additional GPUs on a single instance, and you can get up to 8 with a p3.16xlarge and p3dn.24xlarge. The advantage of scaling-up is that you’re not crossing network barriers to communicate with other CPUs and GPUs which could add to communication latency. Once you’ve reached the limit of scaling-up (8 GPUs per EC2 instance), you can start to scale-out, i.e. add additional instances. As an example, if you need 8 GPUs always prefer a single EC2 instance with 8 GPUs such as p3.16xlarge vs. 2 EC2 instances with 4 GPUs each such as p3.8xlarge.
Thanks for reading, all the code and examples are available on GitHub here:
https://github.com/shashankprasanna/distributed-training-ebs-multi-attach.git
If you have questions, please reach out to me on twitter (@shshnkp), LinkedIn or leave a comment below. Enjoy!