How to debug machine learning models to catch issues early and often
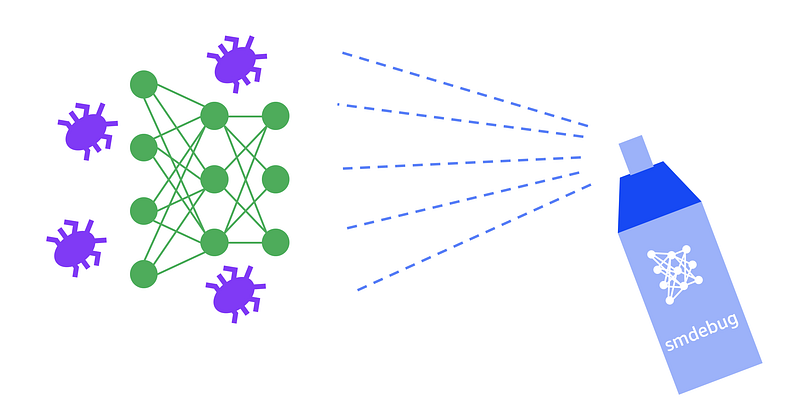
Eek! there’s a bug in my neural network!
If you work in software development, you know that bugs are a fact of life. They’ll be there when you start your project, and they’ll be there when you ship your product to customers. Over the last couple of decades, the software development community has developed a number of tools, IDEs, libraries and techniques to help catch bugs early and often, so fewer creep into production code.
Unfortunately, machine learning developers and data scientists don’t enjoy the same robust set of debugging tools available for traditional software. This is why many of us resort to using print statements in training scripts. The problem gets worse when running distributed training or large-scale experiments on a cluster. You can save logs from multiple workers, but finding the issue is then like finding a needle in the haystack.
In this blog post, I’ll discuss what makes debugging machine learning code different from traditional software and why it’s much harder. I’ll then show how you can address these challenges with better mechanisms for capturing debug information, real-time monitoring of common issues during training and timely intervention to prevent bad jobs from wasting resources.
To implement these techniques, I’ll use Amazon SageMaker Debugger— a managed service and an open-source library for debugging machine learning models. Through examples, I’ll show how you can use Amazon SageMaker Debugger and the smdebug open-source library with TensorFlow, Keras, and PyTorch (MXNet and XGBoost are also supported) to collect debug data during training, setup rules to monitor for conditions and analyze data in real-time or offline.
What makes machine learning debugging different?
If machine learning is just software, doesn’t it make sense to just use the same debugging tools available for traditional software development? After all you have plenty of tools today. You can:
- Use your favorite Integrated Development Environment (IDE) that lets you put conditional breakpoints and inspect intermediate variables,
- Leverage language specific programming constructs for exception handling and type checking
- Use static code analysis tools to catch bugs early and check compliance to standards
- Use debugger libraries such as gdb
- Perform logging and tracing with loggers and carefully selected print statements
Even with all these tools, it’s still harder to find machine learning bugs and there are a few reasons for this, which I describe below.
(1) Machine learning is more than just code
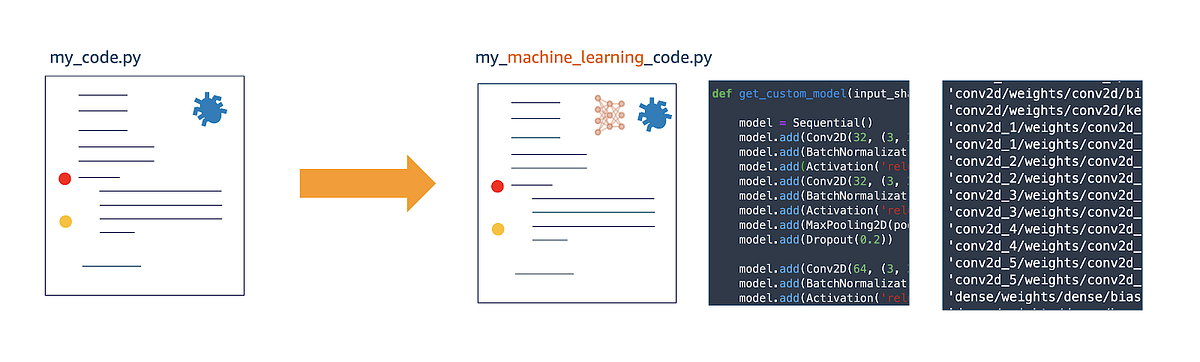
Traditional software code vs. machine learning code
Let’s consider your typical (and simplified) data science problem — you have a dataset and a problem statement, and you have to build a model to predict something based on the data. You then measure its accuracy and when satisfactory use the model — i.e. deploy it, integrate into a larger software project, sell it and so on.
Compared to traditional software, machine learning code has lot more moving parts. There are datasets, model architecture, model weights that are fine tuned during training, optimization algorithm and it’s parameters, gradients that change during training, and so on.
In some sense machine learning code is “dynamic” during the training phase. What I mean by that is your “source code” is essentially changing or evolving as your model trains. Millions of parameters or weights in the model are changing in every step during training. It stops changing once training is complete, at which point what bugs you didn’t catch during training are now part of the model. Contrast this with traditional software — you have logic and rules in code that don’t change every time you run it. There may be conditional branches but the code is still “static” in the sense there aren’t infinite outcomes unlike machine learning training.
Debugging this dynamic, evolving code requires different tools. What you need is a way to inspect the training progress by analyzing millions of variables that are evolving, and take action when certain conditions are met. You want to be able to monitor the model parameters, optimization parameters and metrics to catch issues such as vanishing gradients, activation saturation and others.
Lack of proper tools in this area is why many of us are guilty of using print statements and loggers to analyze training.
(2) Monitoring and intervention during machine learning training is difficult
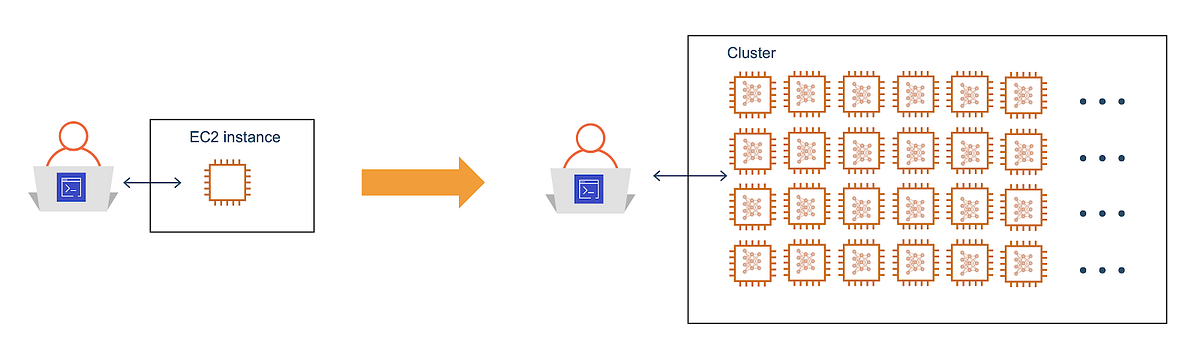
Debugging code running on a cluster is harder than debugging code running on your laptop or Amazon EC2 instance
A lot of machine learning training code runs on clusters, or at least on computers far away from you in the cloud. This is because it’s far more efficient and economical to rent access to a large number of powerful machines with GPUs for short periods of time when running large-scale training.
So, how do you put a conditional breakpoint on code running in a cluster?
When your programming paradigm changes, so should your tools and methodologies for debugging. When you run a distributed training job on a cluster the primary way to monitor progress is to instrument your code to generate logs and save them in a central location for analysis. What you need instead is an easy way to monitor progress in realtime and alert you or take some action when specific conditions are met. And it’d be even better if you didn’t have to make changes to your training scripts. This brings us to our next challenge.
(3) Debugging machine learning code may require significant rewrites or switching frameworks
At its core, machine learning code relies on a series of highly-optimized and finely-tuned linear algebra subroutines written in languages such as C, C++ and CUDA. Higher level frameworks such as TensorFlow, PyTorch, MXNet and others, abstract away underlying complexities and provide you with an easy and convenient way to design and training your models. When you hide complexity, you trade-off control for ease of use, and debugging becomes difficult.
Machine learning frameworks follow two different philosophies — (1) declarative approach where you define a model architecture as a graph which gets compiled, optimized and then executed (e.g. TensorFlow) (2) imperative approach where you define a model architecture as a graph and it gets executed as defined (e.g. PyTorch, TensorFlow eager mode). In the declarative approach you don’t have access to the optimized graph, so debugging can be harder. In the imperative approach debugging is easier, but requires effort to instrument your code at a low level to capture debug data, and in some cases by trading off performance.
For better debugging you have to either write extra code to instrument your training scripts or rewrite your code to support imperative style or switch frameworks. Or worse maintain identical copies on multiple frameworks. All these options are opportunities for more bugs.
(4) Mistakes can cost you — infrastructure costs and more importantly, your time

Machine learning bugs an waste compute and storage resources
Most machine learning issues can be caught early in the training process. Common issues such as poor initializations, vanishing gradients, saturation of activation functions can and should be caught early to prevent wastage of time and resources. Other issues manifest over time such as overfitting or over training. Both early and late occurring issues can cost you.
Early occurring issues are non-salvageable and cause infrastructure resources wastage as the training run produces garbage. Late occurring issues are salvageable if good checkpointing is practiced. By rewinding to the checkpoint when the issue occurred, you still get a good model. However, all resources used for training after the occurrence of the issue is again wasted.
This waste can add up and cost you monetarily and cost you time especially when you have multiple teams running multiple projects in parallel.
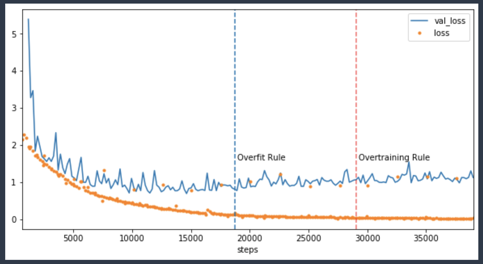
Catch issues such as overfitting early and take action to reduce wastage
In the accompanying chart, you can see an example of training that should have been stopped when the model started to overfit around 20k steps. Instead, the training ran till around 40k costing you twice as much in infrastructure cost. Issues like these are common because we specify a fixed number of epochs to run a training job and then go out to get lunch.
What to look for in a machine learning debugger?
If traditional software development debugging tools don’t work for machine learning, how do you go about debugging machine learning code?
Here are the salient features you should expect from a good machine learning debugger:
- Capture: The debugger must be able to capture model and optimizer specific information during training. The user must be able to specify granularity (how often) and post processing (applying reductions on tensors) to manage debug data.
- React: The debugger must be able to monitor and react to changes in the capture data. The user must be able to specify assertion rules that get triggered when a condition is met, such as exploding gradients or over fitting.
- Analyze: The debugger must allow you to analyze captured data in real-time during training. The user must also be able to run offline analysis on captured data.
Let’s now take a look at how you can use Amazon SageMaker Debugger to perform these debugging steps.
Debugging with Amazon SageMaker Debugger
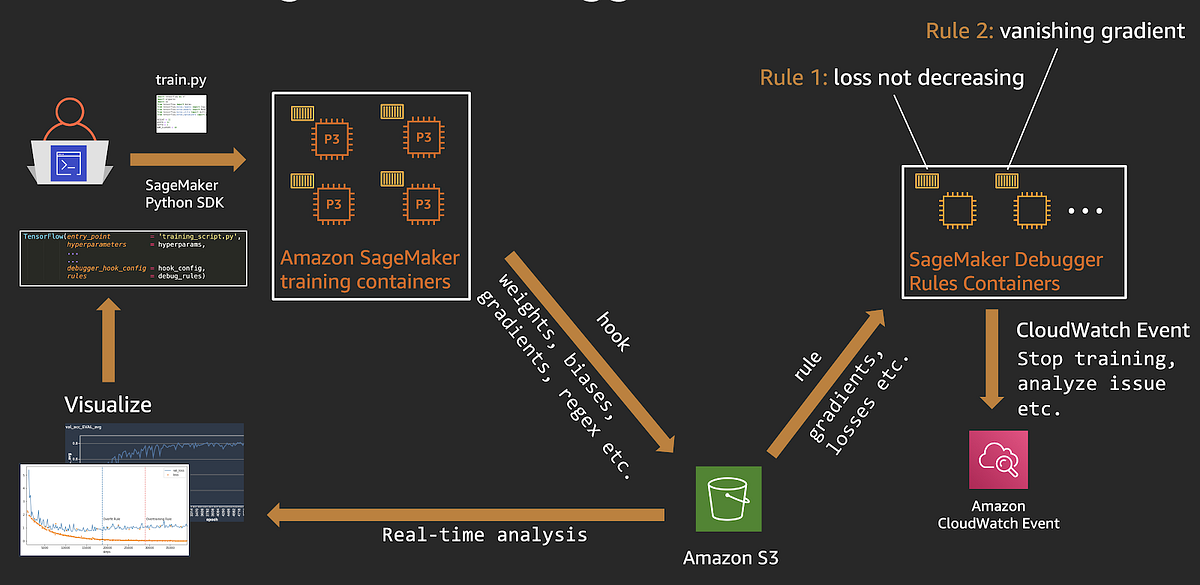
Amazon SageMaker Debugger is a new capability part of Amazon SageMaker suite of services, using which you can get full visibility into model training by monitoring, recording, and analyzing the tensor data that captures the state of a training job. There are two ways to use it:
- Amazon SageMaker managed training: Debugger is automatically enabled when using Amazon SageMaker to train models, and you don’t need to make any changes to your training scripts. Just specify issues to monitor and it’ll automatically run monitoring jobs that can catch many conditions such as vanishing gradients, exploding tensors, overfitting and others during training. It’ll also capture tensors during training and save them in Amazon S3 for real-time or offline analysis.
smdebugopen-source library: For a DIY experience, you can use the open-source library to instrument your training scripts written in TensorFlow, Keras, PyTorch, MXNet or XGBoost, to save debug information. You can then set up and run monitoring locally. You can use it to debug custom training containers on Amazon SageMaker or debug frameworks locally on your laptop, desktop or Amazon EC2 instance before running scaling them on Amazon SageMaker.
Let’s take a look at how Amazon SageMaker debugger enables you to (1) capture debug data, (2) react to specific debug conditions and provides you with tools to (3) analyze debug data.
(1) Capturing debug data using debugger Hooks
Most of the heavy lifting during machine learning training happens in the optimization routines. To be very clear, I’m referring to numerical optimization routines such as stochastic gradient descent (SGD), not compiler optimizations.
These routines are responsible for comparing your model prediction with actual values, calculating gradients and updating the weights to close the gap on the prediction loss. This step happens deep within the machine learning framework, and is responsible for updating millions of model parameters or weights and biases using their computed gradients.
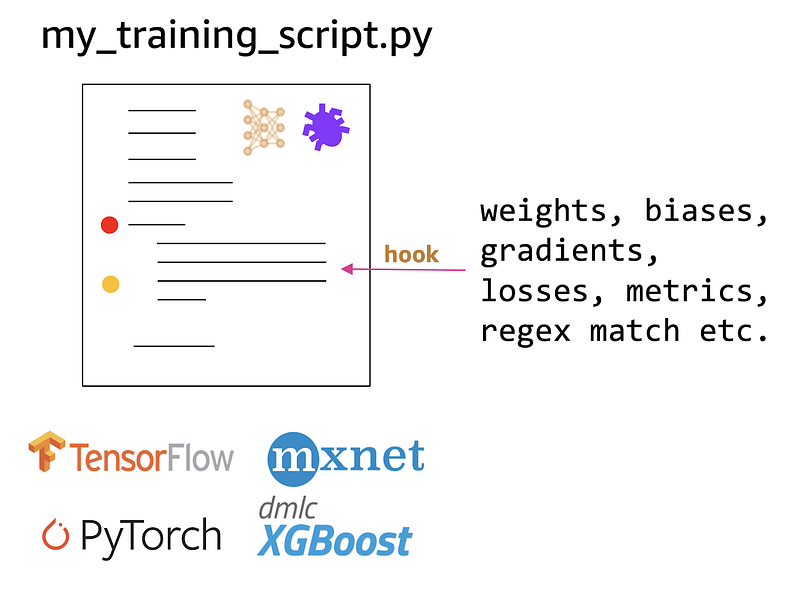
Hooks allow you to capture and save model and optimizer variables such as weights, biases, gradients etc.
To capture this information during training Amazon SageMaker Debugger can automatically insert Hooks into your TensorFlow, Keras, PyTorch, MXNet or XGBoost code. When specifying a SageMaker Debugger Hook you can tell it what information it needs to save during training. Amazon SageMaker Debugger supports a pre-defined list of tensors that you can ask it to save which include weights, biases, gradients, losses, metric, optimizer variables and others. You can also specify a regex string if you want to capture a specific tensor in a specific layer of your model.
Let’s take a look at how you can specify a Hook when using both (1) Amazon SageMaker and when using (2) smdebug open-source library for local debugging or when using in custom containers
Using Hooks with Amazon SageMaker
If you’re using Amazon SageMaker to run training jobs, the Amazon SageMaker Debugger is automatically configured in the TensorFlow, PyTorch, MXNet and XGBoost training job containers and you don’t have to change your training scripts.
When specifying your training job, all you need to do is specify a Hook config as follows.
In this example, the Hook has been specified to save (1) losses, (2) weights, (3) gradients and (4) biases every save_interval = 100 steps. You can also provide start and stop steps if you don’t want to save this information for the entire training duration.
When calling the SageMaker TensorFlow estimator, using the Amazon SageMaker Python SDK just pass the Hook to the debugger_hook_config argument.
If you’re new to Amazon SageMaker, watch this introductory webinar on how to run training jobs on Amazon SageMaker. TL;DR — Amazon SageMaker provides a fully managed experience for running your training jobs. Simply provide your training scripts as shown above, and it’ll automatically provision required resources and run training. There are also plenty of resources on the Amazon SageMaker webpage include training, model tuning and deployments.
You saw how to use debugger hooks when running training jobs on Amazon SageMaker. Next we’ll see how you can also use Amazon SageMaker Debugger locally on your laptop, desktop or Amazon EC2 machine, using the open-source smdebug library.
Using Hooks with with open-source smdebug library
You can use the smdebug library, if want to place Hooks in your training scripts and you’re either:
- Running your training script locally on your laptop or desktop where Amazon SageMaker cannot automatically place Hooks for you
- Running on Amazon SageMaker, but you’re using a custom container image where Amazon SageMaker again cannot automatically place the Hooks for you
If you’re in one of these two situations, you can use smdebug library to place Hooks with minimal code changes. I provide examples with Keras and PyTorch scripts below.
Placing Hook in Keras
Using the smdebug library, you first create a KerasHook, and specify Hook parameters. In this example, I’m asking the KerasHook to save tensor values at out_dir and TensorBoard logs at tensorboard_dir. The tensors I want to save are gradients and biases. I can extend this list to save other values such as weights, optimizer_variables and so on. Behind the scenes KerasHook will configure the necessary callback function to capture data.
Placing Hook in PyTorch
Using the smdebug library, you create a Hook similar to the Keras approach above, and then register the Hook with the neural network in the net variable. You can also register the Hook with the loss function to capture loss values during training.
In your training loop, use the Hook to record the specific tensor values, using hook.record_tensor_value
(2) Reacting to changes in the debug data using debugger Rules
Debug data that you save using Hooks aren’t that useful if you can’t take action on them in real-time during training. This is where debugger Rules come in. A rule is a piece of Python code that detects certain conditions during training. When a rule status changes an Amazon CloudWatch event is triggered and you can take an action on that event such as stop training, or send you an email or text message.
Amazon SageMaker Debugger offers several built-in rules for common issues so you don’t have to write logic for them. These include: dead relu, exploding tensor, poor weight initialization, saturated activation, vanishing gradient, all zero, class imbalance, loss not decreasing, overfit, overtraining and many others. If the rule you’re looking for isn’t here, then you can write a custom rule using the smdebug library as we’ll see below.
For the Rule to actively monitor training jobs and catch issues, it needs to be run as a service concurrently with your training job. If you’re running training jobs using Amazon SageMaker, a Rules container will run automatically monitor your training job, no action needed from you.
Alternatively, you could also run a rule locally on your laptop or desktop using the smdebug library. Let’s take a look at how you can do both.
Using Rules with Amazon SageMaker training jobs
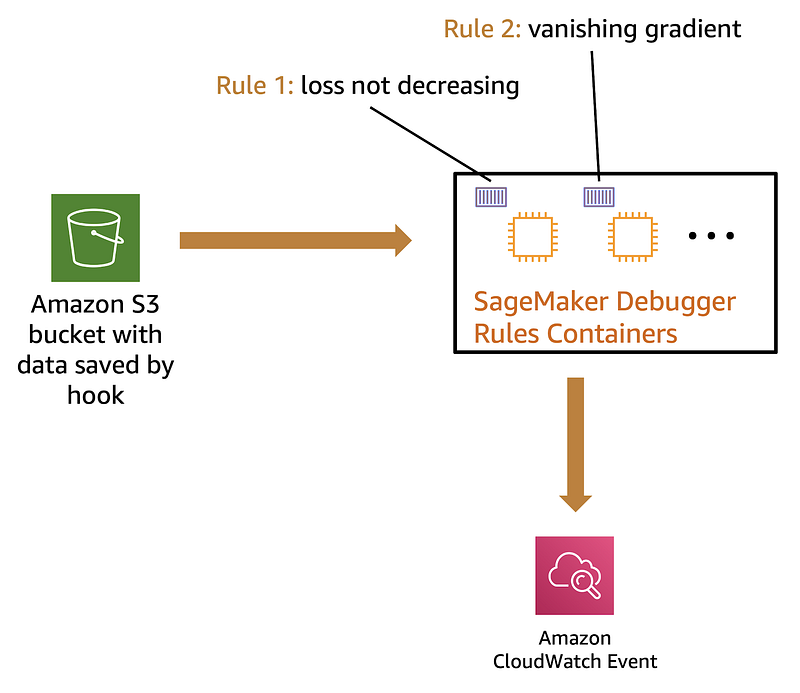
If you’re using Amazon SageMaker to run training jobs, a Rule job will automatically be scheduled to run along with the training job. During training the Rule job fetches tensors saved by Hook (from S3), and invokes the Rule logic.
You can have as many rules as you please and a separate Rule job will automatically be scheduled for you. In the accompanying illustration, I show two rules: loss not decreasing and vanishing gradient. Each will run in a separate container managed by Amazon SageMaker.
When specifying your training job, specify a Hook config as shown below.
This example shows 3 rules — 2 built-in rules (overtraining, overfitting) and 1 custom rule (CustomGradientRule)
For the CustomGradientRule, you should specify what resources you want SageMaker to use in-order to run the rule. In this example, I specify a t2.medium instance which should be sufficient to run a simple Python script implementing the custom rule.
In your SageMaker framework Estimator function (e.g. TensorFlow Estimator below) you provide your Rules config as an argument to rules. This will Instruct Amazon SageMaker to not only launch a training job, but also Rule jobs, equal to a number of rules you specified. In this example that’d be 3 rules.

Training jobs with a rule specification will launch a training job and rule jobs that monitor the training job
Using Rules with smdebug library to run them locally
To run Rules locally on your laptop, desktop or Amazon EC2 instance during training you’ll need to specify a Rule using the smdebug library.
In the example below, I’ve defined a Rule called CustomGradientRule. You can define custom rules by deriving from the Rule class. The core logic is in the invoke_at_step function. Here I check if the absolute mean of the Gradient is greater than some threshold — the threshold is 10 if no threshold is specified.
To invoke the rule, create an object of the custom Rule class and call invoke_rule
Output:
INFO rule_invoker.py:15] Started execution of rule CustomGradientRule at step 0
(3) Analyzing and visualize debug data offline or in real-time during training
Using Hooks you can export data such as weights, gradients and others during training, and Rules let you check for conditions so you can take action. In some cases, you just want to analyze the raw data and plot it to find issues that you don’t understand yet. When you do, you could convert it into a Rule so that you can catch it the next training run.
There are two ways to visualize results:
- Using built-in visualizations tools on Amazon SageMaker Studio
- Custom analysis and visualization on your local laptop, desktop or Amazon EC2 instances
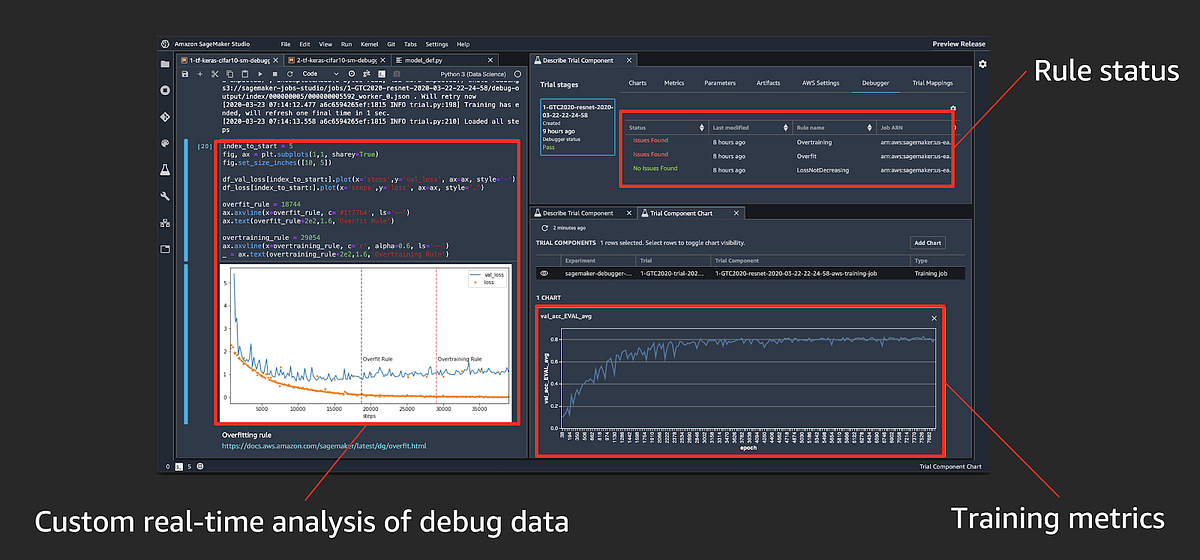
Visualize using Amazon SageMaker Studio
Amazon SageMaker Studio builds on top of the familiar Jupyter notebook experience by integrating capabilities to track experiments, visualize performance curves during training and compare results across different trials in an experiment. You can also pull up custom charts by selecting values to saved by the debugger Hook.
For a demo walkthrough of how to use Amazon SageMaker Studio charts and visualization with Amazon SageMaker Debugger watch my NVIDIA GTC 2020 conference talk video:
GTC 2020: Improve ML Training Performance with Amazon SageMaker Debugger
GTC 2020: Improve ML Training Performance with Amazon SageMaker Debugger
Analyze and Visualize locally using the smdebug library
To analyze your data locally, you’ll need to create a trial using the smdebug library. A trial object can be used to query tensor names, tensor values etc.
For example, if you’ve trained a PyTorch model with the following Hook to save gradients and biases:
hook = smd.Hook(out_dir=f'./smd_outputs/{job_name}',
               save_config=smd.SaveConfig(save_interval=10),
               include_collections=['gradients', 'biases'])
You can create a trial when the training is still running for real-time analysis:
import smdebug.pytorch as smd
trial = smd.create_trial(path=PATH_TO_S3_OR_LOCAL_DIR')
To query what tensors were saved, run:
trial.tensor_names()
Since we asked for gradients and biases to be saved, you’ll see both when you call tensor_names.
Output:
[2020-03-30 06:02:17.108 ip-172-31-28-67:31414 INFO local_trial.py:35] Loading trial pytorch-exp03-30-05-53-52 at path ./smd_outputs/pytorch-exp03-30-05-53-52
[8]:
['CrossEntropyLoss_output_0',
 'Net_conv1.bias',
 'Net_conv2.bias',
 'Net_fc1.bias',
 'Net_fc2.bias',
 'Net_fc3.bias',
 'gradient/Net_conv1.bias',
 'gradient/Net_conv1.weight',
 'gradient/Net_conv2.bias',
 'gradient/Net_conv2.weight',
 'gradient/Net_fc1.bias',
 'gradient/Net_fc1.weight',
 'gradient/Net_fc2.bias',
 'gradient/Net_fc2.weight',
 'gradient/Net_fc3.bias',
 'gradient/Net_fc3.weight',
 'loss_output_0']
To retrieve and analyze gradient/Net_conv1.bias run:
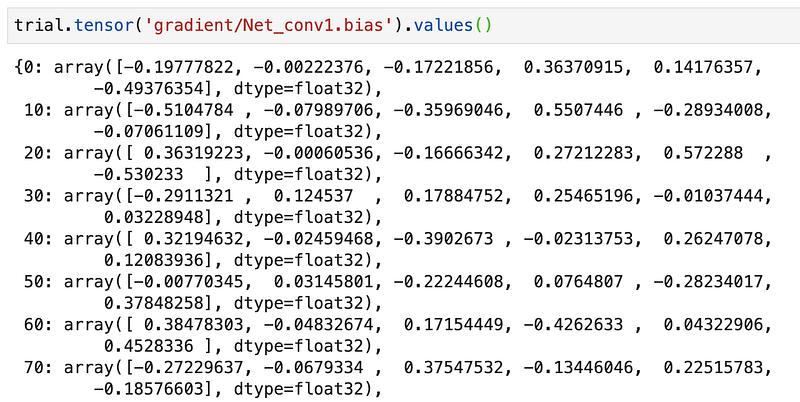
You’ll notice that gradients are saved every 10 steps which is what we specified in the Hook. You can retrieve tensors during training by running the above command in a loop to query most recent values. This way you can plot performance curves or visualize variations in the filter weights as training progresses. Check out this demo on how to monitor class activations in realtime during training using smdebug

https://github.com/awslabs/amazon-sagemaker-examples/tree/master/sagemaker debugger/model_specific_realtime_analysis/cnn_class_activation_maps
How it all works together
End-to-end Amazon SageMaker Debugger workflow
Let’s quickly recap how Amazon SageMaker Debugger works with training with Amazon SageMaker:
- You start an Amazon SageMaker training job, using the SageMaker Python SDK and the framework (TensorFlow, PyTorch, etc.) estimator.
- Amazon SageMaker kicks off a training job on a specified number of CPU or GPU instances. SageMaker will also kick off Rule jobs to monitor the training jobs.
- Using the debug Hook config, Amazon SageMaker will save weights, biases, and other tensors to a specified S3 location.
- When the Hook data becomes available, Rule jobs start running specified Rule logic (over fitting, vanishing gradients etc.) on them .
- When a Rule status changes, a CloudWatch Event is generated, and you could specify a CouldWatch rule to take action such as stop training or send you a text message. Here is an example of using AWS Lambda to stop training when a Rule is triggered.
- To perform real-time or offline analysis on debug data, you can use the
smdebuglibrary to create a trial object by providing the debug data location. The trail object can be used to query tensors and you could plot them to analyze results
Summary
Debugging is hard, and debugging machine learning is much harder. In this post I discussed how you can alleviate some of those machine learning debugging pains using Amazon SageMaker Debugger. Here are 3 ways you can use Amazon SageMaker Debugger for your machine learning workflows:
- You can use it as a fully managed service when running your training jobs on Amazon SageMaker, with no changes to your training scripts. Debug Rule jobs are automatically scheduled and run to check for issues.
- You can use the open-source
smdebuglibrary to debug locally on your laptop, desktop or Amazon EC2 instance by instrumenting your code to add Hooks and run Rules. - You can use both in a hybrid setup by using Amazon SageMaker for training, and using
smdebuglocally to run rules and analyze debug tensors
Since it is highly flexible and also allows you to extend its capability with custom rules and query for custom tensors using regular expressions. All the examples discussed in this blog post, and some additional examples are available here:
https://github.com/shashankprasanna/sagemaker-debugger-examples
For a video walkthrough of Amazon SageMaker Debugger along with Amazon SageMaker Studio demos, checkout my talk at NVIDIA GTC 2020:
GTC 2020: Improve ML Training Performance with Amazon SageMaker Debugger
If you have questions about this article, suggestions on how to improve it or ideas for new posts, please reach out to me on twitter (@shshnkp), LinkedIn or leave a comment below. Enjoy!