From free to production ready: Using Amazon SageMaker Studio Lab and Amazon SageMaker for machine learning
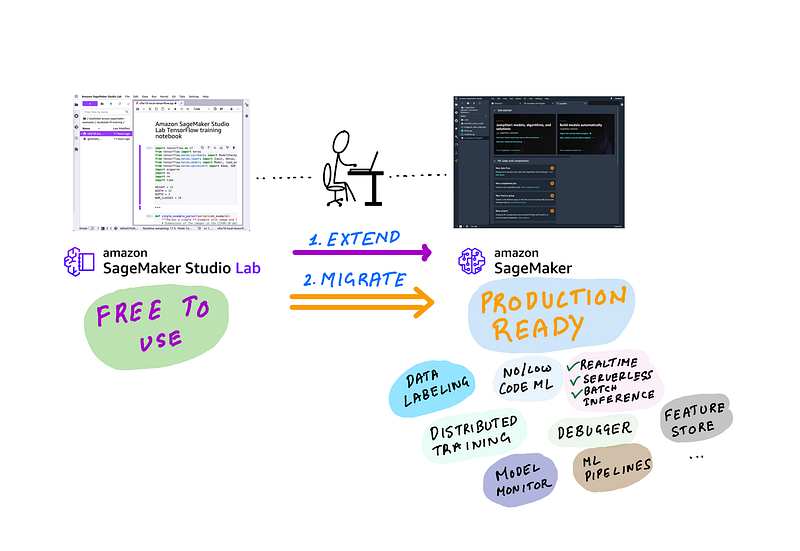
illustration by author
As a machine learning practitioner, you likely spend most of your time in a Jupyter based IDE for development, you use CPU/GPU resources for training and testing, and need a descent sized storage for datasets and metadata. Those are your most basic necessities for an ML development environment, and SageMaker Studio Lab provides all that for free and it’s hosted on the cloud so you can use it from anywhere. But sometimes you need more than just an IDE and fixed compute and storage. You need compute options to scale-up or scale-out training, services for data preparation, labeling, feature store, experimentation, model monitoring, end-to-end automation and more. And that’s what Amazon SageMaker is for.
In this blog post I’ll discuss when you should use use free-to-use Studio Lab, and when you should use Amazon SageMaker and when you should use both. We’ll discuss 3 common requirements:
User Scenario 1: I want a free easy to use ML development environment that I can start learning/experimenting with
User Scenario 2: I want a free easy to use ML development environment and want to advance my experiments and deploy models — as easily and cheaply (frugally) as possible
User scenario 3: I want a production ready solution that offer a modern ML IDE with integrated visualization, ML experiment tracking, feature store, model monitoring, and more and offers end-to-end ML pipeline automation
Setup 1 only requires Studio Lab, and I’ll discuss how to get started with this free service. Setup 2 requires accessing SageMaker Resources from Studio Lab. This is the most detailed section of the blog post, and I’ll share detailed steps with screenshots on how to set up temporary or long-term AWS credentials in Studio Lab to access SageMaker services. Setup 3 requires full migration from Studio Lab to SageMaker studio, I’ll share IDEs offered by SageMaker and their benefits over Studio Lab IDE, I’ll also share resources to get the most out of SageMaker for your ML workflows.
User scenario 1: I want a free easy to use ML development environment that I can start learning/experimenting with
You need: Amazon SageMaker Studio Lab
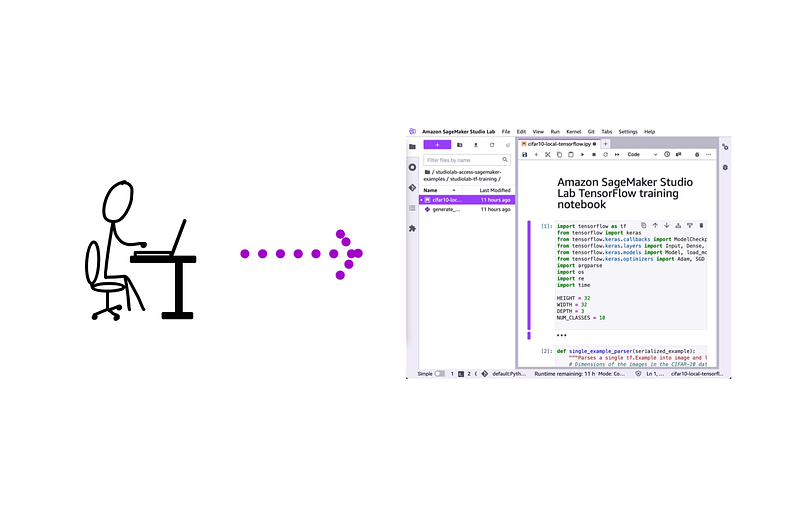
illustration by author
First and foremost Studio Lab is your personal development environment in the cloud that you can access through your web browser and does NOT need an AWS account or any sort of payment. It gives you access to free compute and storage resources and you can choose from 1/ CPU-only or 2/ CPU+GPU.
- CPU sessions last 12 hours, at the end of which you’ll be logged out and you can log back in to renew it for another 12 hours.
- GPU sessions last for 4 hours and you can renew it for another 4 hours (total 8 hours) within a 24 hour period.
You also get about 25 GB of storage and when you switch back and forth between CPU-only and CPU+GPU compute backends your datasets and code will persist across sessions. If you’re an ML enthusiast, a hobbyist, a life-long ML learner, Studio Lab is your perfect partner to take MOOCs and practice pandas, PyTorch and your other favorite data science frameworks.
Once you log-in, you’ll see a familiar JupyterLab interface with beautiful purple accents where you can run Jupyter Notebooks, access the terminal, use Git integrations for development and install Jupyter extensions. Conda comes pre-installed, which you can use to install your favorite data science and machine learning frameworks. I cover how to do this in my introduction to Studio Lab video:
My favorite thing about Studio Lab is that you can use it to prototype within Studio Lab and when you need access AWS resources, you can setup your AWS credentials and you get full access to AWS services such as accessing Amazon S3 for datasets, training on more powerful GPUs, hosting models, automating ML pipelines and more right from Studio Lab. I’ll show you how to set up access to AWS from SageMaker Studio Lab in the next section.
User scenario 2: I want to advance my experiments and deploy models — as easily and cheaply (frugally) as possible
You need: Amazon SageMaker Studio Lab for development and Amazon SageMaker to offload training and model hosting
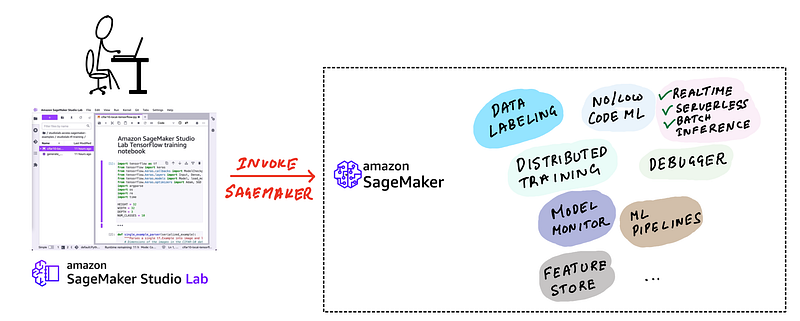
illustration by author
To continue using Studio Lab for development and SageMaker service for model training on more powerful GPUs and for model hosting, you’ll need to first enable SageMaker access in Studio Lab. As you may have guessed, you’ll need access to an AWS account to access AWS services from Studio Lab. You can follow the instructions below to set up programmatic access to Amazon SageMaker (or for that matter any AWS resource) from any systems such as the free Amazon SageMaker Studio lab IDE (or your laptop).
Here are the steps to connect Studio Lab and Amazon SageMaker:
- Open an AWS account
- Create a new IAM user with permissions to access SageMaker resources (or other AWS resources you want) and generate access key and secret for the user
- (optional) create temporary access key and secret
- Create an IAM role for SageMaker SDK to use in Studio Lab
- Setup Amazon SageMaker access within Studio Lab
- Run an example: I’ve included 3 examples in my GitHub repo. I’ll walkthrough 1 example of serverless hosting of models. The rest is homework.
Step 1: Open an AWS account (skip if you already have one)
There are plenty of resources available on how to open an AWS account, and I won’t repeat those steps here. Head over to the AWS account sign up page to open an account. This is a nice article has step by step guidance on how to open an account. You’ll need access to a credit card to open an AWS account, and you’ll only be charged when you consume AWS resources.
Step 2: Create a new IAM user with permissions to access SageMaker resources
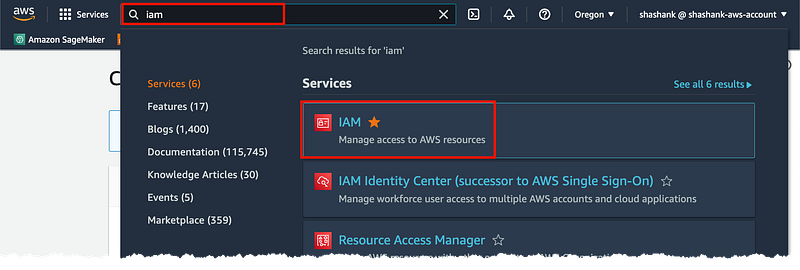
On your brand new AWS account, my you to first create an IAM user. An IAM user is an entity you create within your AWS account that you use to access AWS services. If you’re the sole user of the AWS account and want unrestricted access to all AWS services, then you can be a user with Administrator privileges. How AWS best practices recommend that you always apply least-privilege permissions to users and roles (we’ll come to roles in a bit). Let’s create an IAM user with credentials to programmatically access Amazon SageMaker services from Studio Lab.
In the AWS Console search for and click on IAM
screenshot by author
Click on “Users” on the left menu and click on “Add users”

screenshot by author
Give a user name and check “Access key — Programmatic access”
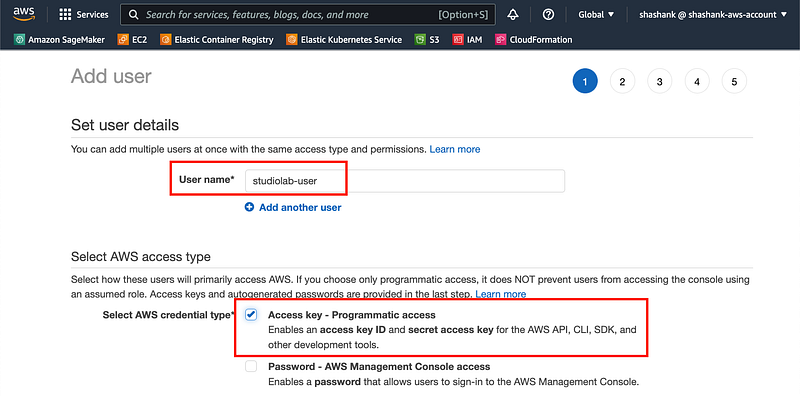
screenshot by author
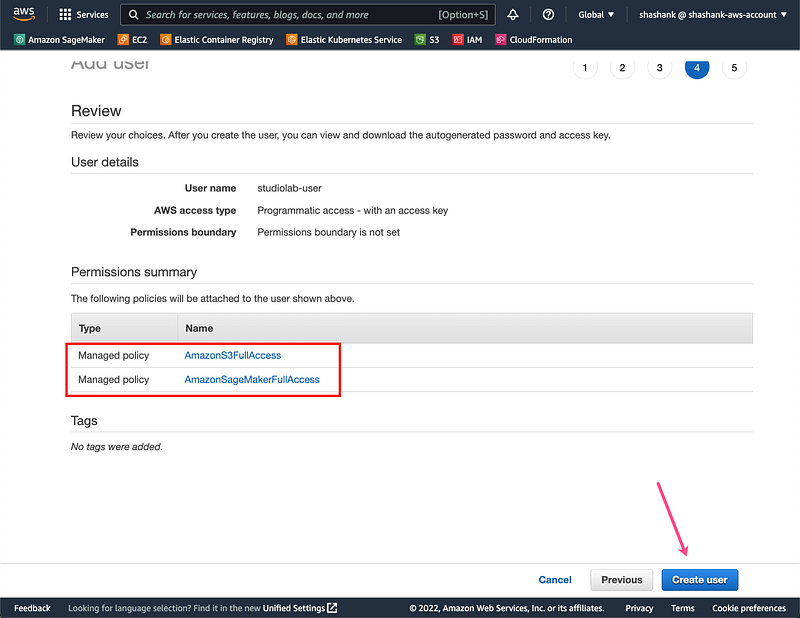
You can either give this user Administrator access or click on “Attach existing policies directly” and give specific service permissions. Let’s choose the latter options and choose “AmazonSageMakerFullAccess” and “AmazonS3FullAccess” as the specific services we can access from Studio Lab. If you are the sole user you can choose to give yourself administrator access which will allow you to access any AWS service from Studio Lab. Click “Next” twice to skip tags. Click Create user
screenshot by author
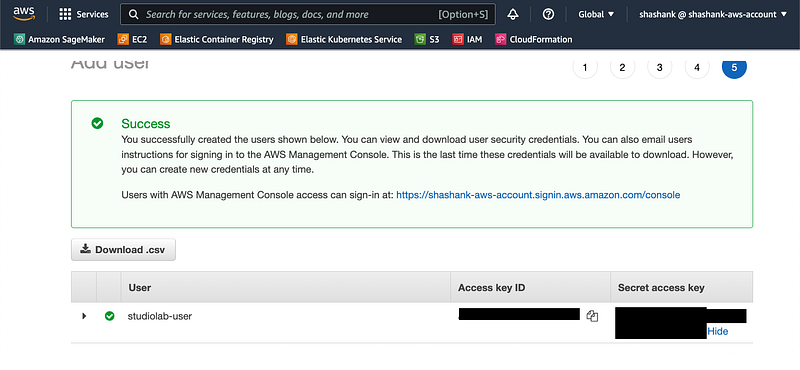
IMPORTANT: Copy the Access key ID and Secret access key and store it safely. You’ll need it to access SageMaker from Studio Lab. You won’t have access to the secret later if you forget to copy it now!
screenshot by author
Run aws configure on Studio Lab to setup the credentials for this IAM user:
$ aws configure
AWS Access Key ID [None]: AKIAIOSXXXXXXEXAMPLE
AWS Secret Access Key [None]: XXXXXXXXXXMI/K7MDENG/bPxRfiCYEXAMPLEKEY
Default region name [None]: us-west-2
Default output format [None]: json
You’re all set! You can now use Amazon SageMaker features in SageMaker Studio.
If you want a more controlled way of accessing AWS resources from an external (outside AWS) service like Studio Lab, it’s advised to use temporary credentials vs. long-term credentials that you used in this section. In Step 3 below I’ll show you how to create temporary credentials from your personal laptop/desktop that expire and only use those in Studio Lab.
Step 3: (Optional): Create temporary access key and secret
Benefit of temporary credentials is that they expire automatically after a set period of time and you can create keys with specific expiry duration. Personally (not a best practice, just personal preference), I like to set up my local laptop with AWS CLI and the user credentials we got from Step 2. I use that to generate temporary credentials for use on other systems like cloud based IDEs like Studio Lab, edge devices like raspberry pi etc. This way I won’t need to worry about unexpected usage in the future since the credentials will expire.
On your laptop/desktop install AWS CLI. After the install is complete, run aws configure and input the AWS Access Key ID and AWS Secret Access Key you obtained from Step 2. A quick guide is in this documentation page. You can choose the region closest to you geographically. For example, I’m on the west coast in the US and I typically chose us-west-2. Note: not all SageMaker features are available in all regions, you can find a list of supported regions on the pricing page. Choose the output format as JSON — this is important, since you’ll be copy and pasting the output into your Jupyter notebooks in Step 5.
$ aws configure
AWS Access Key ID [None]: AKIAIOSXXXXXXEXAMPLE
AWS Secret Access Key [None]: XXXXXXXXXXXXXXXXXXXXXXXXXXXXXXEXAMPLEKEY
Default region name [None]: us-west-2
Default output format [None]: json
Unce you’ve configured the AWS CLI on your local machine, run the following to generate temporary credentials for use in Studio Lab. This generates temporary credentials that expire in 12 hours (or 43200 seconds). You can set a different expiry duration, but 12 hours matches the session duration of Studio Lab CPU sessions, after which you can renew both together.
aws sts get-session-token --duration-seconds 43200
The output should like something like this:
{
“Credentials”: {
“AccessKeyId”: “ASIAWTIRCZXXXXXXXXXX”,
“SecretAccessKey”: “XXXXXXXXXXXXXXXB3j1BQFiiC/Ue5jEe”,
“SessionToken”: “<VERY LONG SESSION TOKEN>”,
“Expiration”: “2022-XX-XXTXX:XX:XX+00:00”
}
You can now use the temporary credentials generated in your Studio Lab notebooks to access SageMaker services.
Step 4: Create a SageMaker Execution role for SageMaker SDK to use in Studio Lab
When you use SageMaker SDK in Studio Lab (or your laptop) to host models or run SageMaker managed training, you should grant it access to other AWS services it needs to do those things. An execution role that we’ll create now, grants SageMaker specific permissions to use other AWS resources like EC2 (launch CPU, GPU instances), ECR (store and access container images) etc. Note that this is different from the IAM user we created earlier which grants you the permission to access AWS services. SageMaker execution role is specifically for SageMaker to access AWS services on your behalf.
Create the SageMaker execution role with these quick steps:
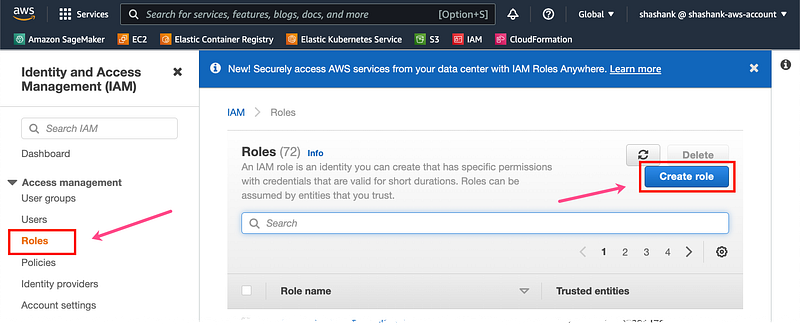
In the AWS Console click on Roles and then select Create role.
screenshot by author
Under “Use cases for other AWS services” select SageMaker and click Next
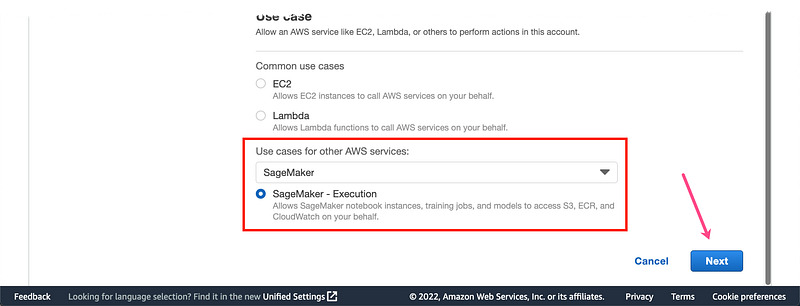
screenshot by author
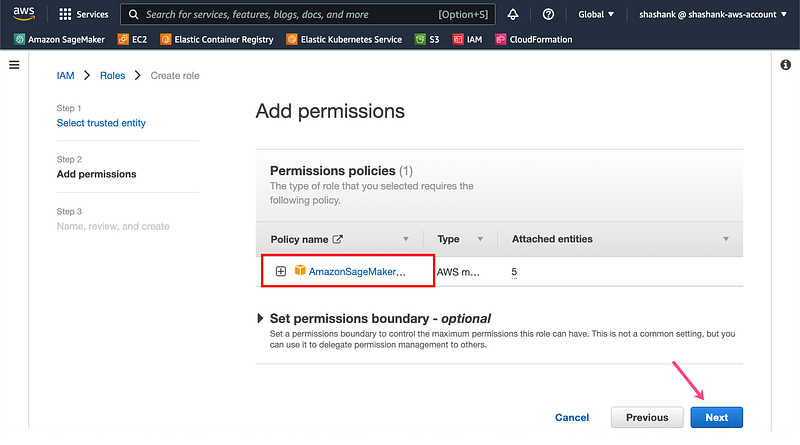
The IAM managed policy, AmazonSageMakerFullAccess is automatically attached to this role. Click Next
screenshot by author
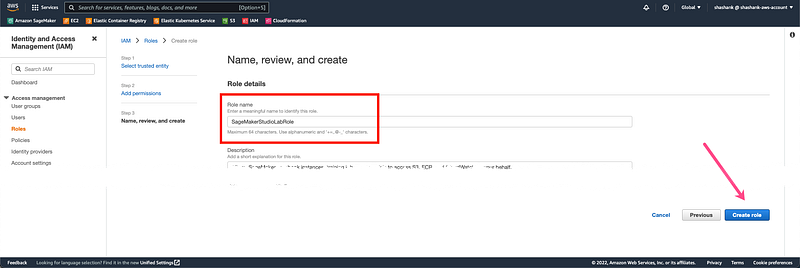
Give the role a name (e.g. SageMakerStudioLabRole) in the text field under Role name and select Create role.
screenshot by author
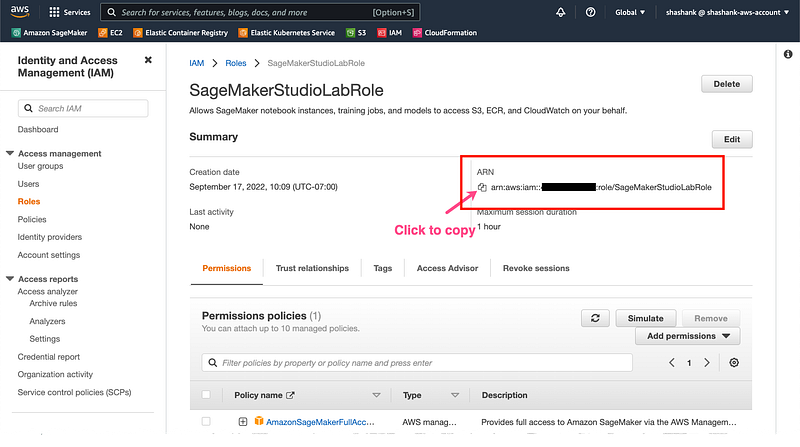
On the Roles section search for the role you just created “SageMakerStudioLabRole” and click on it. Copy the role ARN, we’ll need to provide this to SageMaker SDK when using it from Studio Lab.
screenshot by author
Step 5: Setup Amazon SageMaker access within Studio Lab
If you followed all the steps above you should have with you:
- An AWS account
- Long-term IAM role credentials: Access Key ID and Secret Access Key
- (optionally) Temporary IAM role credentials: Access Key ID and Secret Access Key and Session Token
- SageMaker execution role ARN
Now head over to SageMaker Studio Lab to setup the AWS credentials using the AWS CLI (AWS CLI comes pre-installed)
Option 1: If you followed Step 3 and want to use long-term IAM role credentials from Step 2, open Studio Lab terminal and run aws configure and input the long-term role credentials you saved from Step 2. Choose the closest region to you and output format to json.
Option 2: If you followed optional Step 4, then you can setup temporary IAM role credentials from (optional) Step 3. To do that we’ll not use aws configure for this approach, rather we’ll use these credentials directly in the Jupyter Notebook where you’ll run your code as follows. Running the following in a cell at the top of your notebook will set the environment variables with your temporary credentials in the notebook session. We’ll see it in action in the next section.
credentials = {
“Credentials”: {
“AccessKeyId”: “<AWS_ACCESS_KEY_ID>”,
“SecretAccessKey”: “<AWS_SECRET_ACCESS_KEY>”,
“SessionToken”: “<AWS_SESSION_TOKEN>”,
}
}
os.environ[“AWS_ACCESS_KEY_ID”] = credentials[‘Credentials’][‘AccessKeyId’]
os.environ[“AWS_SECRET_ACCESS_KEY”] = credentials[‘Credentials’][‘SecretAccessKey’]
os.environ[“AWS_SESSION_TOKEN”] = credentials[‘Credentials’][‘SessionToken’]
Your first example: Host models using Amazon SageMaker from Amazon SageMaker Studio Lab
Let’s test your setup with an example. In your Studio Lab terminal, run the following to clone an example repository in to the home directory:
cd
git clone https://github.com/shashankprasanna/studiolab-access-sagemaker-examples.git
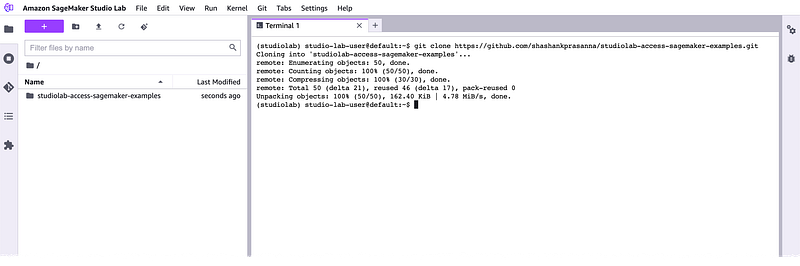
screenshot by author
In Studio Lab navigate to studiolab-sagemaker-examples > studiolab-sagemaker-tf-deploy and open Notebook tensorflow-serverless-inference.ipynb

screenshot by author
Install TensorFlow, SageMaker SDK and other packages only the first time you run this notebook.
Setup your (optional) temporary credentials described in Step 5 Option 2, if you’re using long-term credentials described in Step 5 Option 1, skip this cell, but make sure you already setup this up with aws configure
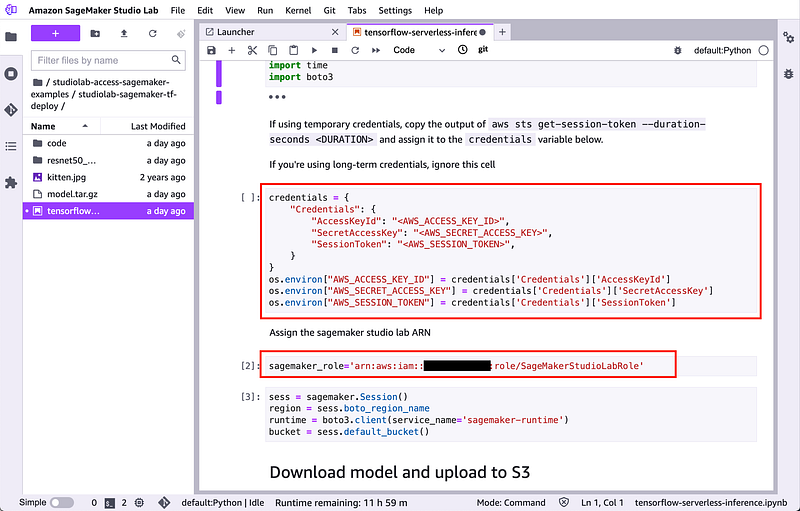
screenshot by author
Then setup the SageMaker execution role discussed in Step 4, as shown in the screenshot above.
Run each cell to host a model and test the model endpoint from Studio Lab, hosted by SageMaker.
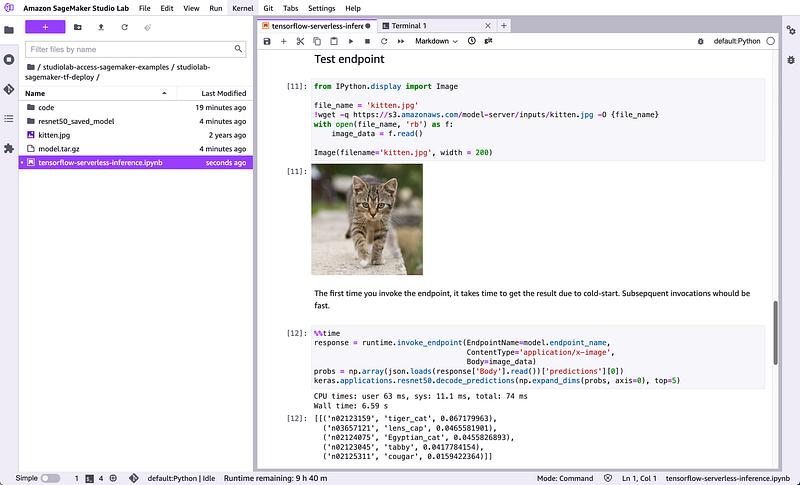
screenshot by author
Clean up resources that you use so you don’t incur additional charges on your AWS account. Delete both the endpoint (if you don’t need it anymore) and S3 artifacts
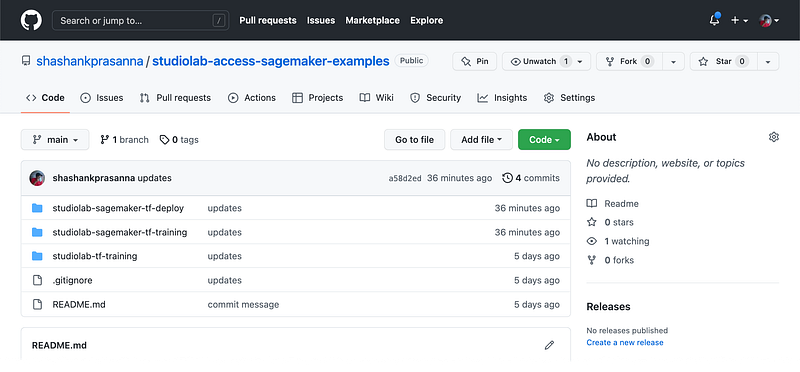
You can also try 2 other examples I’ve included in my GitHub repo for this blog post:
screenshot by author
User scenario 3: I want a production ready solution that offers ML experiment tracking, feature store, model monitoring, built-in visualization, and more and offers end-to-end automation
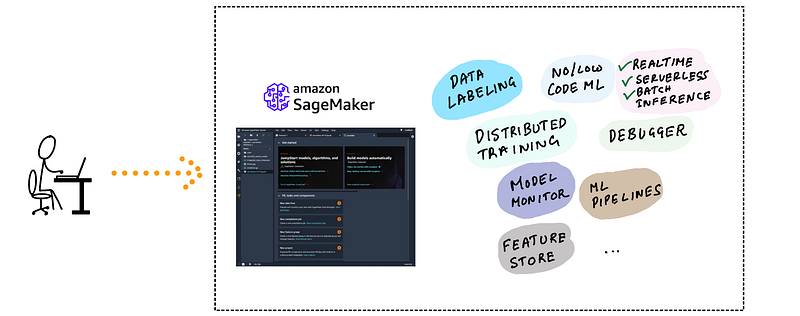
illustration by author
Amazon SageMaker is a fully-managed service part of an AWS account that includes choice of IDEs, low-code & no-code UI, data labeling and processing, wide selection CPUs, GPUs, and storage options for training, inference and scaling, end-to-end automation using MLOps practices and much more. You pay as you go, just like any other AWS service.
Amazon SageMaker offers two separate development environment solutions as part of it’s suite of capabilities:
- Amazon SageMaker Notebook Instances: SageMaker Notebook Instances, like the free Studio Lab offer a hosted JupyterLab service, but the difference is that you can choose what type of CPU or GPU instance you want from a large list of supported instance types, including single and multi-GPU instances and CPU instances with large number of vCPUs for multi threaded applications. This choice of compute backend is tied to your Notebook Instance and can’t change it without shutting down your instance. You can find the supported list and pricing here. If you build your own custom Docker containers, then this is the recommended development environment for you. Since Studio Lab already runs inside a container environment, you can’t use it to build nested Docker containers.
- Amazon SageMaker Studio: Amazon SageMaker Studio Notebooks, like the free Studio Lab and Notebook Instances offer a hosted JupyterLab services, and the difference is that you can switch CPU and GPU backends dynamically during use. If you’re running your notebook with a CPU-only backend, you can switch to a GPU backend with a couple of clicks. In addition it offers a host of point-and-click enhancements over standard JupyterLab for experiment management, AutoML, model deployment, pipeline management and more.
screenshot by author
AWS documentation has a complete guide to migrating your code and notebooks from Studio Lab to either SageMaker Notebook instances or SageMaker Studio. A great place to start using SageMaker Studio is this Studio Tour documentation webpage. And the official SageMaker examples repository.
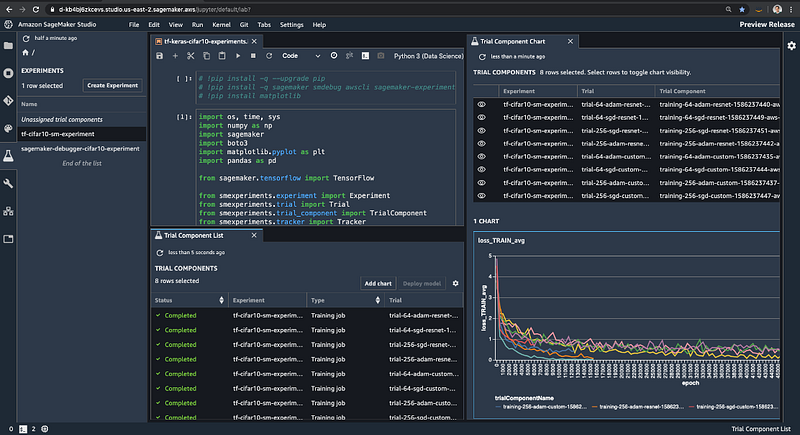
I’ve written about how to managed ML experiments in Studio and how to debug models using Studio here:
Managing Experiments with SageMaker Studio:
Debugging models with SageMaker Studio:
Inference recommender with SageMaker Studio
Training compiler with SageMaker Studio
Serverless Inference with SageMaker Studio
Conclusion
To wrap up recommendations:
- I need a free ML development environment in the cloud You need: SageMaker Studio Lab
- *I need a free ML development environment in the cloud & I want to offload training and deployment to more powerful GPU (GPU clusters), and access services to help manage ML pipelines.*You need: SageMaker Studio Lab for development and Amazon SageMaker services for everything else
- I need a more powerful, flexible and modern ML development environment which supports CPU/GPU backend switching, integrated monitoring, experiment tracking, visualization and no-code UIYou need: Amazon SageMaker for your entire ML workflow
If you don’t already have a free to use Studio Lab account, you can request a free account here: https://studiolab.sagemaker.aws/requestAccount. If you don’t have an AWS account you can open a free tier AWS account, and follow the instructions here to get started.
IMPORTANT: AWS free tier account only offers specific resources for free for limited usage. You CAN incur a charge for using services that are not covered in the free tier or for exceeding the free tier limit for that service. I highly recommend setting up an AWS budget with notifications to stay within your target budget
If you found this article interesting, consider following me on Medium. I publish much more in depth guides on machine learning covering distributed training, experiment management, debugging, selecting GPUs and others. You can also follow me on twitter (@shshnkp), LinkedIn or leave a comment below. Want me to write on a specific machine learning topic? I’d love to hear from you!